Up here in the cold north we don't exactly have a need to make snowflakes. I can merely throw my hand out the back door and grab a scoop if I have the need for snow.
Sir Bean specializes in saving snowballs in my freezer and princess Petunia is really good at getting it her boots.
Mittens are often covered in it.
It tracks in my back door and and leaves sloppy puddles all over the kitchen.
The snow is fairly shallow this year but I shoveled it above my waist several times last year.
It is beautiful and cold and fluffy or heavy.
Thick wet flakes that stick like ice cream or light and diamond-like, forming a crust the kids like to crunch through with their boots.
It can come in biting like ice chunks or floating like bubbles.
Snow has that warp speed hypnotizing effect while driving after sunset with a small wind.
But it can be gentle as a butterfly kiss on a perfect cloudy and quiet evening.
Catch it on a black sheet of construction paper and you can see the most amazing God created delicate lace designs.
I know Snow.
What I don't know about about is crystals. And why they form. So I thought it would be neat to find a season appropriate chemistry experiment explaining crystal growth. Rock candy sounded good but better for summertime. How about those crystal snowflakes I saw somewhere....? Internet search to the rescue!
After finding several different tutorials we settled on this one because it gave me some very clear instructions.
I found this one for the info on the why behind the crystal formation.
Check out this video from Sick Science!
Steve Spangler Science has many, many experiments and he not only gives video tutorials he explains how and why behind the results. This is priceless for me because I am not a sciency kind of homeschool mom. I need all the help I can get!
It was so easy. The kids had a blast. And I have some beautiful semi permanent snowflakes decorating the kitchen. :)
 | |
| 9 tablespoons of borax in the jar |
 |
| Add 3 cups of boiling water and then mix it up! |
 | |
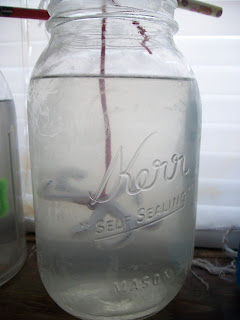
| Place your pre-twisted beautiful snowflake creation in the solution. |
 |
| Use string to tie the snowflake to the pencil and then rest it on top of the mason jar. |
 | |
| This one got some food coloring. |
 |
| Pretty. |
 | |
| Now wait. Check every couple hours and you will see the crystals growing. |
 | |
| Once they look like this through the solution they are ready. This is about 24 hours. |
 |
| There is a reason they said wide mouth. It was a mite stuck but did come out minus a few crystals. :) |
 | |
| The crystals grow all over the inside, too! |
 |
| And a snowflake! |
 |
| Unique creativity for each one. |
 |
| Spider Snowflake? |
Borax Snowflakes
1. Form your pipe cleaners into
a snowflake shape or be creative!
2. Boil 3 cups of water. Add 9 tablespoons of borax to your wide mouth mason jar. Mix in the boiling water.
3. Attach your pipe cleaner
shape to the string and hang it from the pencil. Submerge it
in your solution filled jar.
4. Let sit for 24 hours. Check it often for crystal growth!
Always Blessed,
Gretchen :)
Frugally Sustainable
Artful Homemaking
Far Above Rubies
A Wise Woman Builds Her Home
Wholehearted Home
Growing Home
Wisdom Wednesdays and Link UpArtful Homemaking
Far Above Rubies
A Wise Woman Builds Her Home
Wholehearted Home
Growing Home
No Ordinary Blog Hop
Frontline Moms Friday Fun
The Welcoming House

That looks like a fun project!! Thanks for linking up over at WholeHearted Home this past week.
ReplyDelete