Showing posts with label DIY. Show all posts

Thursday, February 21, 2013

Goin' Crunchy~ Disinfectant Towels


Are you familiar with those disposable, disinfectant towelettes (yes that is a real word...) that come in the cylinder shaped containers. The very convenient, snap tight lid, pull the towelette through the perfect shaped space on top to use anywhere, anytime, for almost any cleaning emergency wonder invention? I love those things!

I used to have one in the bathroom, one in each vehicle, one in the kitchen.... I was a disinfectant towelette (yep still a word, feels weird typing it..) kinda gal. By now if you have read anything in my Goin' Crunchy section you know that I love a clean house. I also love fun cleaning supplies. I just enjoy the satisfaction and it was pretty much bred into me so it isn't going away anytime soon.

I have been, for about a year, searching out ways to clean without the chemicals, and without the cost. Enter in my love for instant cleaning towels (oh so much better..) and a want to get back to natural items and what you get is my version of the Disinfectant Towel!

I searched the internet last summer and never really came up with what I wanted that would work for us. I pieced together a few different recipes from here and here and then made it work for us!


Disinfectant Towels

White Vinegar, Tea Tree Oil, Lavender Oil, Water

Bucket of Rags


Water and Oils
Pouring

Disinfectant Towels
2-3 Cups of distilled water*
2-3 cups of vinegar
20 drops of Tea Tree Essential oil
20 drops of Lavender Essential oil (you could use Lemon, Grapefruit, Peppermint...)
Large Bucket with a seal tight lid. We use an old gallon size ice cream pail.
Assorted rags. We have old mismatched socks, cut up bath towels, several torn up ancient t-shirts and apparently according to that picture someone's old Hanes boxers.

Start by cleaning your utensils and bucket in hot, soapy water. *To make distilled water bring filtered water to a boil and then cool. Mix together the water, vinegar and oils. In the large bucket place your assorted rags. I started this process by folding them all and placing them nice and neat in the bucket. After the third time I decided they would get just as wet all crumpled up and so now they just get thrown in. :) Pour your vinegar/water/oil mixture over it and seal it up.
Use as needed and then throw the soiled rags in the laundry and when your bucket is empty start all over again.

We use these everywhere and go through them quite quickly. If you don't have a potty training child that misses the toilet on occasion or any boys that miss the toilet daily you may need less. Last summer I carried a smaller version to my daughter's softball games to scrub yuck off of dirty fingers and dusty bleachers.

Let me know how it goes!

Always Blessed,
Gretchen :)

Possibly Linking With:

Thursday, February 14, 2013

Easy-Peasy Homemade Greek Yogurt *Recipe

Homemade Greek Yogurt

Warning: Picture Ladden Blog Tutorial!
Why: Because I learn better with pictures and because I have done this wrong more times than I'd like to admit.  Pictures help you do it right!

2nd Warning: You will love your own yogurt so much you will never waste money on store bought again. Unless of course you run out during the summer because the kids eat it like ice cream. :)

I can be a slow learner. Gulp. Tough to admit but true nonetheless. So when I first decided to make yogurt I scoured the internet. I pinned on Pinterest. I searched cookbooks and photocopied recipes from the 70's. Everyone had the best idea and way to do it. They were all similar, and yet the steps were sometimes different. After wading through the helpful Blogosphere and checking on all types of milk and yogurts to culture with (did you know you can buy just the culture through the internet?) I came up with a pretty solid plan. I have now been successfully making yogurt for almost a year.

Easy-Peasy with these directions. I'll be sure to let you in on the whoopsies I had along the way and hopefully you can avoid them. :)


Easy-Peasy Greek Yogurt


Start with about one gallon of milk. We have tried whole, 2%, and skim. I like the skim milk yogurt because it has more 'bite' to it. I have also tried organic and there was no noticeable difference. I have a friend that uses raw milk and she says it is divine. Heat this milk till it is warm enough to be uncomfortable if you dip your pinky in for more than 20 seconds. Totally scientific, huh? If it is too hot it will kill the yogurt culture. Too cold and it won't grow properly. I usually stick it in the Crockpot on low for about an hour or so. Stir occasionally. (Do not be embarrassed to set a timer to remember to stir it. I would forget to change clothes out of the dryer if I didn't set the timer.)


You will need a 1/4 -1/2 cup of a yogurt culture to start your batch. I use a plain Greek yogurt. The plain regular style yogurt will work as well but I have had better and more consistent results with a Greek style thick yogurt.


When the milk is warm take about 1 cup of it and place in a bowl with 1/4-to 1/2 cups of the store-bought yogurt. This is a tempering process. You want to slowly incorporate the yogurt to the milk in the Crockpot and keep the temperature fairly even. By adding a small amount of milk to your yogurt and then mixing it you have a thinner yogurt culture and a similar temperature to place back into Crockpot.


Once the yogurt and 1 cup of milk are mixed it looks like this. Pour this mixture back into the Crockpot.


Pour it slowly. 


Give it a gentle stir to incorporate your tempered yogurt mixture into the warm milk in the Crockpot.


Unplug it! (Please don't forget this while you are answering the phone and a question about fractions while sending your toddler to take a potty break.) Place a lid on it. I like to flip the lid upside down so it sits tighter.


Now I usually cover the Crockpot in numerous bath towels and leave it covered on the counter for about 10 hours or overnight. The towels act as an incubator to keep the heat in and help the yogurt to form within the Crock. This works so surprisingly well! However, if you don't have a lot of counter space.....


... you can place it in your empty, cold oven wrapped in towels overnight and up to 12 hours. From personal experience and a melted Crockpot I will insist you find some way to remember that you have a Crockpot and a bunch of flammable towels In Your Oven. I use a sticky note that resides on my 'Bake On' button the moment I place that yogurt in the oven. Trust me when I tell you melted Crockpot electric cord and singed towels stinks up your house and causes your 9 year old to consider calling 911. Use the Sticky Note. :)


Okay! It has been 10 hours! This is a properly set yogurt. It is firm and jiggly; a bit like jello. There is some liquid around it. That is whey. 


Line a large colander with some cheesecloth. This is a double layer because I cut it too short in my it is the beginning of the day and I am half asleep so where in the world is my coffee stupor. Usually I use a single layer. Place that lined colander over a mixing bowl.


Pour the yogurt into the colander. 
If you want a regular style yogurt after this initial straining you are done. 
Place in the fridge and eat up!


If you are looking for Greek yogurt then fold the cheesecloth over the yogurt and place in fridge. Let it strain. Anywhere from 3 hours till 6. Let it go too long and you will have a Ricotta style soft cheese.


The yogurt will be very firm and creamy. Usually there is a slight indentation of the cheesecloth on the yogurt.


Pull the cheesecloth off and place your Greek Yogurt into a storage container.


There it is! I store mine in a small Rubbermaid container. This one has a 4 cup capacity.


Don't throw out the whey that has strained out of the yogurt. It can be used in place of milk in most any baking item or for cooking. I have used it in homemade bread, pancakes, and homemade hamburger hotdish. 
Store in the fridge in another container. 
Please don't put it in a juice pitcher because some unsuspecting teenager or husband may think it is lemonade and have a very large swig. It does not taste like lemonade. 


 Serve with honey or homemade preserves and some granola. Yumm-o!

We also use Greek Yogurt in place of sour cream, for recipes asking for mayo and in any dips I make.

ENJOY!

Always Blessed,
Gretchen :)

Possibly Linking With:

Sunday, February 10, 2013

Make Your Own Brown Sugar *Recipe


 "It is the sweet, simple things of life which are the real ones after all."~ Laura Ingalls Wilder
cane sugar and molasses


I grew up making brown sugar every time we had a need for it. Somewhere along the line I stopped making it myself and resorted to buying it simply because it saved me an extra 3 minutes in my kitchen. I started up again last year to save me the three dollars and because I have been trying to get back to the basics. The ones I learned from my mama as a child.

Since I am head chef and baker in this house, we are transitioning into more honey, molasses, and (slightly less refined) cane sugar and using much less refined white sugar. I am not the sugar police; just trying to do better with more whole type kind of foods. 

I have yet to see a brown sugar substitute of a healthy variety in my local area, so I decided to give my childhood brown sugar recipe a try with the cane sugar I have using. The granules are larger and look different so I wasn't sure.

It turned out lovely! I have used it interchangeably in several recipes that called for regular brown sugar. I see no noticeable difference in taste or texture. *I'm not sure how it would work in candy, such as a caramel. If you try it let me know!

cane sugar

molasses

mixing

brown sugar!

Brown Sugar
1 cup cane sugar (or white sugar)
1/8-1/4 cup dark molasses 

Mix with a fork until the molasses is fully incorporated. The less molasses the lighter the brown sugar. Use more molasses for darker brown sugar. The cane sugar does not 'pack' into a measuring cup as well but I have had no problem with it working. Use equal measure for regular brown sugar.


Always Blessed,
Gretchen :)
Possibly Linking With:

Quote from: http://www.searchquotes.com/quotes/author/Laura_Ingalls_Wilder/3/

Thursday, February 7, 2013

Goin' Crunchy~ DIY Furniture Polish


Lemon Juice, Olive Oil, and Lemongrass Essential Oil

I really like how furniture polish smells. The lemony fragrance brings me back to my childhood. I have chatted before on how much I love to clean. Sometimes to a fault. I think it was probably groomed into me from the time I was able to hold a cloth and dust. 

The house I did most of growing up in was an old turn of the century two story farm house. My mother would run about fruitlessly trying to keep up with the country dust that whipped across the open fields and deposited rich black topsoil and brown gravel road dust all over the house. The wood floors caught it and so we dusted those daily. The couches and coffee table hid dust of the bunny variety. So there was weekly cleaning to catch those gray fuzzy bunnies. In the summer, when the windows were let open to bring in a breeze, I could wake up and find dust on the kitchen table in a light layer just waiting , begging me to write HELLO with my pinky finger. We rinsed cups before using them even if they came out of the cupboard. It was really everywhere. 

My brothers were often regulated to more manly type jobs but I honestly think she just didn't trust them to not waste a whole can of dust spray and go through three dusting rags just on the dining room. So my sister and I got to dust. With rags and special dusting mops! With lemony furniture polish that we could spray on the antique, wooden, buffet table and desk that shined it right up.

I love the instant gratification of a good dusting. I mean, you can SEE the clean! And the house smells clean, even if it isn't in the most tip-top shape. So now it is my Prince Ray's job to once a week dust up this house. He generally talks Princess Petunia into helping him and her little 2 year old self is so very proud to help with a big kid chore. He does not think it manly enough but is willing to to do it without complaining (usually) 'for Princess Petunia'. 

A clean dusting of the house always makes me feel better. Yes, I know. Sounding a bit off kilter? I come from a long line of neurotic cleaners. If Lemon Dusting Spray makes me feel better, then so be it. 

So in my search to make my own cleaning supplies I found a good one here and here. I tweaked the recipe and this now my favorite for homemade Lemon Dusting Spray. 


oil


lemon


water


DIY Lemon Dusting Spray
one 4 oz spray bottle
1/2 teaspoon of olive oil
3 teaspoons lemon juice
10 drops of Lemongrass Essential Oil (or lemon, or orange...)
distilled water *
Using a funnel to pour into the spray bottle, combine the olive oil, lemon juice, and essential oils. 
Fill the rest if the bottle with distilled water.

When using: shake the bottle well before using and spray on soft cloth or directly on the furniture. Wipe clean! :) This can be doubled or tripled but I usually just make it as I need to. Smells like summertime and childhood.

*distilled water is just filtered, boiled, and then cooled water. Any possible organisms in your water are then killed and thus a product that does not turn into a science petri dish.

So make some better for you and the environment, frugal, Lemon Dusting Spray and then DUST IT!


Always Blessed,
Gretchen :)

Possibly Linking With:


Friday, February 1, 2013

Goin' Crunchy~ Orange Peel All Purpose Cleaner


Last year I was on a mission to save us some money AND healthy up my house. My sister and I started using all natural, homemade cleaners. I was shocked at how easy and how frugal it was to use homemade cleaners. 

Now, I am a confessed, reformed, cleaning supply lover. I used to coupon clip for exciting new household cleaners. All those shiny colors and comic strip starred 'WOW! All New Formula!" call to me like a siren's song. I also loved those pre-packaged towels with disinfectant super powers. I was a sucker for smelly, linen-scented sprays and sprinkles. Something to scrub the bathroom sink and a different one to scrub the shower. A toilet cleaner, a floor cleaner, cleanser, and window spray all for just the bathroom. Oh yeah, and the blue smelly bar to make my toilet water blue because it somehow seemed cleaner. 

One day while teaching Prince Ray which cleaner was for what so he could do his bathroom 'quick clean' chore (Yes, they take turns quick cleaning the bathroom because it is NOT me or the Princesses that pee BEHIND the toilet. Just sayin'.)I got a wake up call. Prince Ray gives me this slightly confused look and in all his boyishness type honesty says "Why do we need so many!?"

Good question. Do I really need a separate cleaner for the floors and the baseboards? Do I need to have cleanser, and toilet scrubby, and window cleaner, and electronics cleaner, and dust spray, and wood oil, and all purpose cleaner, and de-greaser, and dish soap, and grout cleaner, and... well you get the idea.

Better question is: Do I need to be spraying all of these ridiculous chemicals into the air daily that can affect my family's breathing? Do I need all this fake air freshener and surface disinfectant? What are we breathing into our bodies?! YIKES! 

If you don't believe that your bought cleaning supplies could make you sick all you have to do is a quick google search and be amazed at the number of people whose health has responded positively by dropping the store bought, chemically laden cleaners. I can attest that my asthmatic child is breathing better and using his inhaler 1/3 of the time he was using it. We changed how we eat and we changed how we clean and it has made all the difference in the world. This is of course our personal experience, but it might be worth a try!

On to the recipe! So easy you will be on board for trying it with the next orange you eat!


 Orange Peel All Purpose Cleaner


Peel the oranges! I did 4 this day.


Give the yummy oranges to your children for breakfast!

I use most all the Orange peel. Sometimes I save some out for making Dried Orange Peels.

Place in a glass jar that has a tight fitting lid. This is a canning jar but I have used any glass jar that is available.

 Pour in straight white vinegar to the top. Cover the orange peels.


It is ready to be used when it is orange in color and the peels have begun to sink a bit.

Here are 3 different stages of 'brewing'. Three weeks, two weeks, and just made.

I like to strain it through a small sieve before placing in my spray bottle.

Ready to clean!

We use this for floors, counters, walls, the stove, door knobs, bathroom sink and shower, any mildew, dirty baseboards, yucky, greasy messes and pretty much any other hard surface that needs cleaning. It smells delightful. It is super inexpensive. It uses what I always already have around my house. And... It Works.

Note* I have also thrown in grapefruit, lemon, or lime peels as we have them. They can be a bit acidic but all citrus has natural cleaning and disinfectant qualities. See here for more information.


Always Blessed,
Gretchen :)

Possibly Linking With:


Sunday, January 6, 2013

Making Snowflakes

Up here in the cold north we don't exactly have a need to make snowflakes. I can merely throw my hand out the back door and grab a scoop if I have the need for snow. 
Sir Bean specializes in saving snowballs in my freezer and princess Petunia is really good at getting it her boots. 
Mittens are often covered in it. 
It tracks in my back door and and leaves sloppy puddles all over the kitchen. 
The snow is fairly shallow this year but I shoveled it above my waist several times last year. 
It is beautiful and cold and fluffy or heavy.
Thick wet flakes that stick like ice cream or light and diamond-like, forming a crust the kids like to crunch through with their boots. 
It can come in biting like ice chunks or floating like bubbles.
Snow has that warp speed hypnotizing effect while driving after sunset with a small wind. 
But it can be gentle as a butterfly kiss on a perfect cloudy and quiet evening.
Catch it on a black sheet of construction paper and you can see the most amazing God created delicate lace designs.
I know Snow.

What I don't know about about is crystals. And why they form. So I thought it would be neat to find a season appropriate chemistry experiment explaining crystal growth. Rock candy sounded good but better for summertime. How about those crystal snowflakes I saw somewhere....? Internet search to the rescue!

After finding several different tutorials we settled on this one because it gave me some very clear instructions.
I found this one for the info on the why behind the crystal formation.
Check out this video from Sick Science
Steve Spangler Science has many, many experiments and he not only gives video tutorials he explains how and why behind the results. This is priceless for me because I am not a sciency kind of homeschool mom. I need all the help I can get! 

It was so easy. The kids had a blast. And I have some beautiful semi permanent snowflakes decorating the kitchen. :)
9 tablespoons of borax in the jar

Add 3 cups of  boiling water and then mix it up!
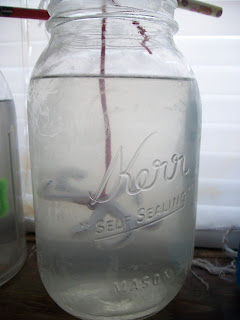
Place your pre-twisted beautiful snowflake creation in the solution.

Use string to tie the snowflake to the pencil and then rest it on top of the mason jar.
This one got some food coloring.

Pretty.
Now wait. Check every couple hours and you will see the crystals growing.

Once they look like this through the solution they are ready. This is about 24 hours.

There is a reason they said wide mouth. It was a mite stuck but did come out minus a few crystals. :)
The crystals grow all over the inside, too!

And a snowflake!
Unique creativity for each one.
Spider Snowflake?

Borax Snowflakes  
1. Form your pipe cleaners into a snowflake shape or be creative!  
2. Boil 3 cups of water. Add 9 tablespoons of borax to your wide mouth mason jar. Mix in the boiling water.
3. Attach your pipe cleaner shape to the string and hang it from the pencil. Submerge it in your solution filled jar.
4. Let sit for 24 hours. Check it often for crystal growth!


Always Blessed,
Gretchen :)


Possibly Linking With:
Cornerstone Confessions
Wisdom Wednesdays and Link Up
No Ordinary Blog Hop
Frontline Moms Friday Fun
The Welcoming House