Showing posts with label recipe. Show all posts

Monday, March 18, 2013

Ham n' Bean Soup *Recipe


Last week I wrote on how to make Ham Stock (Bone Broth)


Now let's make soup!


 Ham n' Bean Soup
4 to 5 qts of Ham Stock with meat from the bone
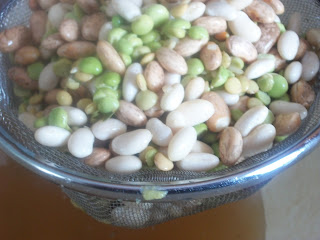
1 lb dry mixed (pinto, black, navy, kidney, even split peas or lentils) beans* ** (soaked, rinsed, and drained)
1 onion, chopped
1 -2 cloves of garlic,minced
2 stalks of celery, chopped
2 carrots, chopped
1 -2 small potatoes, chopped
1 sweet medium potato, chopped
paprika, pepper, dried parsley, rosemary sprigs, and ground cloves to taste

Stovetop: Mix Ham Stock and beans together and simmer gently on stove for 2 hours.  About a half hour before serving add veggies and spices. Cook until potatoes and carrots and done.

Crockpot: Place Ham Stock and beans in crockpot and cook all day 8 to 10 hours on low. About 2 hours before serving add veggies and spices and cook on high until potatoes and carrots are done.

My Bean Mix has Pintos, Navy Beans, Lentils, Split Peas, and Brown Rice.

* To soak beans rinse with water and place in a large bowl. Cover the beans with warm water and about a tablespoon or so of lemon juice or apple cider vinegar. Leave it alone for about a day. (This is when I am cooking down my ham bone.) You could probably leave it for even longer. Some folks advise dumping the water after a day and adding new warm water and then continuing the soak for another day. I haven't done this. I usually cook them the next day. :) If there is a scum of bubbles that forms on top of the bowl, skim it off and discard. This will make the beans more "user and eater friendly". :) They should double in size. Before adding to your stock to cook, rinse and drain the beans.

** Canned or pre-cooked beans can be used. Lessen your overall cooking time.


If I happen to have some bean soup, I want to be able to locate, at pretty prompt intervals, some little objects that look to me like beans. I don’t want a bowl of it where the beans have just been driven through it at low tide. ~  Will Rogers July 17, 1927  

My sentiments exactly.

Always Blessed,
Gretchen


Possibly Linking With:


Monday, March 11, 2013

Ham Bone Stock (Bone Broth)

Stock to a cook is voice to a singer.
--Anon.


I have saved vivid memories from my growing years, of the Welcome Home after a long mid-winter's school day. The lengthy, cold bus ride home over jouncy, jutted gravel roads was finally over. Often I would pass the riding home time by pressing my nose and mouth against the frozen and frost-nipped bus windows and breathing warm air on them to make a melted spot just large enough to peek through. The barren Southern Minnesota farm fields fill up with snow so high that sometimes I could, in my imagination, pretend I was somewhere warm, like the dessert, staring at sand dunes instead of blowing, whisking snowflakes forming hills and valleys all over the county. By the time that golden yellow bus pulled up to my driveway the sun was in full sun set mode, falling lower and lower on the horizon. 

When I was young enough my mom was still home with the little kids and it wasn't unusual to open the front door and be comforted by the warmth of the wood stove and the smell of fresh baked bread and soup simmering on the gas stove. It always made my mouth water to see that homemade bread all brown and glistening with fresh butter on the cutting board. The soup though is a thing of beauty all on its own. The big kettle three quarters full, steam twisting, curling, unfurling from the open pot like young ferns do in the spring. 

After stomping the snow off my boots and peeling off layers of outer wear I would hurry over and see what kind we were having. Thick and bubbly split pea with chunks of potato? Chicken with carrots and spaetzle? Hamburger with tomatoes and corn? Ham and Bean? Oh the possibilities were almost endless. 

That steam would warm me right up and to this day I crave warm filling soup on a cold day. It is frugal, versatile, healthy, and easy!

I was given a ham bone after a Christmas party way back at the end of December and threw it in the freezer. Last week I decided it was time to cook that bone down and make some soup. I do not profess to be and expert, just a cook with a bit of experience. So here is my basics for ham stock. :)

Day 1:
Stock Pot
 I like this stock pot. It holds about 8 to 10 quarts comfortably. You want one that is deep enough to hold a chicken carcass and cover it with a couple inches of water.  This is a tutorial for ham bone broth but it could easily adjust for chicken or beef or even veggie broth. It was inexpensive for the amount it is used. On a side note I used it to water bath can some things last fall. It was a good investment.

Veggies and Bone
When I am trimming celery, or peeling carrots I will save those extras and bag them and put in my freezer for soup day. Instead of throwing out the bits of onion or garlic throw them in a bag and place in the freezer. When it comes time to make stock use those veggie bits and pieces instead of cutting up new ones. It is the ultimate in frugal cooking when you can use as much as possible and waste little .

Notice, as well, that the ham bone is fairly meaty. You want a bone that isn't picked completely clean. Those are still usable but make a thinner broth. I will usually try to leave, on purpose, some meat in the bag or on the bone. You will be thankful on soup day that you did. :)

Cloves, Allspice, Bayleaf
Place all those veggie scraps, your meaty ham bone, and some spices in the stock pot. Cover with water. I would use good old fashioned tap water if it is good to drink. Cover those veggies and bone fully, about two inches or so over the top. They need to be fully submerged. 

Apple Cider Vinegar
I learned to add an acid of some sort. This will, so I am told, help to pull all that goodness out of the bones. I have used a lemon, vinegar, red wine vinegar, or apple cider vinegar. A couple Tablespoons or a half a lemon should do it.

Now set that pot to simmer on a back burner, cover it up, and ignore it for the most part all day. I check every couple of hours to make sure it isn't dry or simmering too high. If you need to add water now and then, go for it. The idea is to slowly cook down that bone so that the meat will fall off and the marrow will leach out into the water, thus flavoring it. The longer you cook it down the better the broth. The meat and veggie should shrink down and the water should condense almost by half.
Please, do not rush this. Making good stock is an easy, basic, mostly hands off project. It does however take time. Give it the time it needs. A day is not an over estimate. I almost always cook for a day and then pick through the rest on day 2. 
That being said, at the end of the day, I take the whole pot and put it in the fridge over night.

Day 2:
Fat

Take that stock pot out of the fridge. The fat should have risen to the top. I skim the fat off and throw it. My dad would hate that. :) But I can't stomach it.

Strain the broth through a large colander.
Using a large colander, strain the broth through the first time to catch all the veggies and meat and bone.

Strainer.
I like to then use a fine sieve strainer to strain once more. This is preference and really not necessary.

Stock for the Freezer.
This particular time I got enough stock for a batch of soup in the crock pot (5 quarts), and was able to freeze about 9 cups of leftover broth. The picture above shows them in 2 cup Parmesan cheese containers. I mark them and date them before putting in the freezer. This stock is good for cooking beans, for flavoring rice, or adding to stew or soup when it has gotten too thick.

Pick through the colander.
Now onto the messy part. Pick through that leftover veggie/meat/bone mess and save out the meat. If I had more critters I would probably share that leftover bone, but our Miss Ivy Kitty is a Diva Cat and refuses to eat anything but her Friskies. Therefore, I chuck all this leftover in the garbage at this time. :)


I ended up with about a cup or so of meat. Now this is plenty for us as we are having Ham and Bean soup. If you need more, add from another source. 


Add that Ham to your soup stock.
At this point, your soup is ready for all the yumminess you can come up with. Add what your heart desires. Vegetables, beans, lentils, split peas, pasta. The possibilities with a good stock are almost endless.

Part 2 of this series will be my recipe for Ham 'n Bean Soup. It is filling to the tummy and good for the soul. Stay Tuned!

Always Blessed,
Gretchen :)
Possibly Linking With:


Wednesday, February 20, 2013

Granola Bar *Recipe


These are the most yummy homemade snack. 

I was hesitant to try a granola bar thinking that my kids would probably snub them. They are granola bar connoisseurs. When I quit buying pretty much all processed food snacks, granola bars were the last to go. They seemed so.... healthy. So the kidlets got an unhealthy taste for them.

On a family camping trip, my sister brought along her homemade granola bars. The kids snarfed them down like they were sneaking Easter candy. She was onto something. I thought though that they may be too much work. I don't really put time intensive snack making on my list of to-dos everyday so they just didn't get made.

Last week my Sara came over and showed me how to make them so I could bring them to a homeschool group Valentine party. They are so easy! She took all the pics and then blogged about it. My turn!

The original recipe came from a cookbook entitled Miserly Meals .

This is my version!
Oiling the Pans

Dry

Optional Yumminess

Mixing

Press in pan and Bake

Snacky Goodness


Granola Bars
2 cups rolled oats
1 cup whole wheat flour (could substitute if you can't do wheat)
1 cup brown sugar  (check out my substitute)
1/2 teaspoon baking powder
1 teaspoon cinnamon
1/2 teaspoon nutmeg
1 teaspoon sea salt
1 teaspoon vanilla
1/4 cup molasses
1/2-3/4 cup of honey 
*optional ingredients

Combine the dry ingredients.  Then add molasses, honey, and vanilla.  Use your hands to get it good and mixed up. (Perhaps you have helper for this job?) It should stick together, like you could roll it into a ball. If it is too dry add a bit more honey. If it is too sticky add a bit more flour. Press into a 9x12 pan that has been greased with coconut oil. Bake at 325 degrees for 15-18 minutes or until golden brown. Cool completely and then cut into bars. 

*OPTIONAL Yumminess can be added with the honey and molasses. Add 1 cup of any of the following: dried fruit (we did golden raisins, raisins, and dried cranberries), chocolate chips, coconut, sunflower seeds, or chopped nuts. Go and get your creative thinking cap on. These are so versatile!

These bars were crunchy and very satisfying. They would did make a lovely breakfast and snacktime treat. Enjoy!

Always Blessed, 
Gretchen  :)

Possibly Linking With:


Friday, February 15, 2013

Hot Cocoa Mix *Recipe


I am sharing the most amazing Hot Cocoa recipe. It is my all time favorite!

I have some very bad memories of hot cocoa mixes my mom made when we were kids. They always seemed kind of.... thin and unchocolately. It tasted like watered down chocolate pudding made with powdered milk. Nasty. Those bad cocoa consumptions left a bad taste in my mouth (bahahaha) when it came to hot cocoa mixes and I became a cocoa snob. Gasp!

As we began to create 'make it yourself' items in our kitchen one of the first things I tackled was a homemade cocoa recipe. I did not want a 'just okay' cocoa. I wanted a childhood toasty toes by the heater while drinking some warm marshmallowed cocoa after playing outside in the snow kind of memory in a cup. I searched everywhere! With milk and without. I added shaved chocolate (what a mess) and chocolate chips (impossible to clean out of tall coffee cup). There were organic versions and carob versions. I tried probably 10 different variations of cocoa mix before settling on this one!

We have some very big cocoa drinkers here and although it isn't the purest and most 'green' recipe it is far better then the preservative laden name brand cocoa mix. It is easy. It is inexpensive and I generally have everything I need right here. It passes the Princess Petunia (not too sugary) and the Princess Peony (very chocolaty) test. The best part of all is that it makes a huge recipe thanks to Kimberly, a mom of many over at Raising Olives.

Princess Petunia loves her Cocoa and I don't feel so bad offering it before bed or as a snack in the afternoon. I have even been known to offer it as milk when we have run out.(Does anyone else run out of milk?) It does have powdered milk in it so that has to count, right?


Amazing Hot Cocoa


Amazing Hot Cocoa
4 cups powdered sugar
5 to 6 cups powdered milk 
2 cups of baking cocoa
2 scant teaspoons sea salt
4 teaspoons of corn starch* 
2 pinches of ground cayenne pepper 

Mix all together in a large mixing bowl. I also like to use my hand blender to pulverize the powdered milk. Just cover the bowl with a drying towel and then blend away. Please don't skip this. Use a blender or a food processor if you can. It is important for the smoothness of the cocoa. Place in a glass storage container. I had cocoa mix enough for a 2 quart jar and half of a one quart jar.
 
To serve: Mix 1/4 to 1/3 cup of mix to hot water. Stir well and enjoy

*arrowroot powder would probably work

 Bit of Cocoa with a dollop of coconut milk.

Always Blessed, 
Gretchen

Possibly Linking With:


Thursday, February 14, 2013

Easy-Peasy Homemade Greek Yogurt *Recipe

Homemade Greek Yogurt

Warning: Picture Ladden Blog Tutorial!
Why: Because I learn better with pictures and because I have done this wrong more times than I'd like to admit.  Pictures help you do it right!

2nd Warning: You will love your own yogurt so much you will never waste money on store bought again. Unless of course you run out during the summer because the kids eat it like ice cream. :)

I can be a slow learner. Gulp. Tough to admit but true nonetheless. So when I first decided to make yogurt I scoured the internet. I pinned on Pinterest. I searched cookbooks and photocopied recipes from the 70's. Everyone had the best idea and way to do it. They were all similar, and yet the steps were sometimes different. After wading through the helpful Blogosphere and checking on all types of milk and yogurts to culture with (did you know you can buy just the culture through the internet?) I came up with a pretty solid plan. I have now been successfully making yogurt for almost a year.

Easy-Peasy with these directions. I'll be sure to let you in on the whoopsies I had along the way and hopefully you can avoid them. :)


Easy-Peasy Greek Yogurt


Start with about one gallon of milk. We have tried whole, 2%, and skim. I like the skim milk yogurt because it has more 'bite' to it. I have also tried organic and there was no noticeable difference. I have a friend that uses raw milk and she says it is divine. Heat this milk till it is warm enough to be uncomfortable if you dip your pinky in for more than 20 seconds. Totally scientific, huh? If it is too hot it will kill the yogurt culture. Too cold and it won't grow properly. I usually stick it in the Crockpot on low for about an hour or so. Stir occasionally. (Do not be embarrassed to set a timer to remember to stir it. I would forget to change clothes out of the dryer if I didn't set the timer.)


You will need a 1/4 -1/2 cup of a yogurt culture to start your batch. I use a plain Greek yogurt. The plain regular style yogurt will work as well but I have had better and more consistent results with a Greek style thick yogurt.


When the milk is warm take about 1 cup of it and place in a bowl with 1/4-to 1/2 cups of the store-bought yogurt. This is a tempering process. You want to slowly incorporate the yogurt to the milk in the Crockpot and keep the temperature fairly even. By adding a small amount of milk to your yogurt and then mixing it you have a thinner yogurt culture and a similar temperature to place back into Crockpot.


Once the yogurt and 1 cup of milk are mixed it looks like this. Pour this mixture back into the Crockpot.


Pour it slowly. 


Give it a gentle stir to incorporate your tempered yogurt mixture into the warm milk in the Crockpot.


Unplug it! (Please don't forget this while you are answering the phone and a question about fractions while sending your toddler to take a potty break.) Place a lid on it. I like to flip the lid upside down so it sits tighter.


Now I usually cover the Crockpot in numerous bath towels and leave it covered on the counter for about 10 hours or overnight. The towels act as an incubator to keep the heat in and help the yogurt to form within the Crock. This works so surprisingly well! However, if you don't have a lot of counter space.....


... you can place it in your empty, cold oven wrapped in towels overnight and up to 12 hours. From personal experience and a melted Crockpot I will insist you find some way to remember that you have a Crockpot and a bunch of flammable towels In Your Oven. I use a sticky note that resides on my 'Bake On' button the moment I place that yogurt in the oven. Trust me when I tell you melted Crockpot electric cord and singed towels stinks up your house and causes your 9 year old to consider calling 911. Use the Sticky Note. :)


Okay! It has been 10 hours! This is a properly set yogurt. It is firm and jiggly; a bit like jello. There is some liquid around it. That is whey. 


Line a large colander with some cheesecloth. This is a double layer because I cut it too short in my it is the beginning of the day and I am half asleep so where in the world is my coffee stupor. Usually I use a single layer. Place that lined colander over a mixing bowl.


Pour the yogurt into the colander. 
If you want a regular style yogurt after this initial straining you are done. 
Place in the fridge and eat up!


If you are looking for Greek yogurt then fold the cheesecloth over the yogurt and place in fridge. Let it strain. Anywhere from 3 hours till 6. Let it go too long and you will have a Ricotta style soft cheese.


The yogurt will be very firm and creamy. Usually there is a slight indentation of the cheesecloth on the yogurt.


Pull the cheesecloth off and place your Greek Yogurt into a storage container.


There it is! I store mine in a small Rubbermaid container. This one has a 4 cup capacity.


Don't throw out the whey that has strained out of the yogurt. It can be used in place of milk in most any baking item or for cooking. I have used it in homemade bread, pancakes, and homemade hamburger hotdish. 
Store in the fridge in another container. 
Please don't put it in a juice pitcher because some unsuspecting teenager or husband may think it is lemonade and have a very large swig. It does not taste like lemonade. 


 Serve with honey or homemade preserves and some granola. Yumm-o!

We also use Greek Yogurt in place of sour cream, for recipes asking for mayo and in any dips I make.

ENJOY!

Always Blessed,
Gretchen :)

Possibly Linking With: